
Whew! This one took a while, and I'm really glad it's done.
It all started early this fall when I saw this child's rocker at a furniture exhibit. It was so simple - just four pieces of wood. The idea of making one for Z just kept nagging me - how hard could it be? I've worked with wood before, I'm not afraid of power tools. It wouldn't even take that much wood. Well, it would have been easy if I would have stuck to a simple design, but of course, I couldn't do that, that would be sensible.
Never able to leave well enough alone, I of course had to redesign the whole thing first and make it far more complicated before I was happy with it. Oh, and of course, don't forget I’ve never made a piece of furniture before or even made anything out of birch plywood more complicated than a painting panel, but that’s never stopped me before. That’s the problem with obsessive crafting disorder – there’s no reasoning with it.
Whenever starting an unfamiliar project, my first step is always to find a completed project that is similar (at least in structure) to what I want to make. I had the inspiration chair, but I wasn’t able to take measurements of it. For the size of the seat, angle of the back, curve of the rocker, etc., I needed more information. Luckily, I found this instructional to fill in those gaps. All of the structural measurements I got from that chair. As long as I kept those the same on my chair, it would function properly and I could change everything else to fit my own design.
My next step is always to plan. This can go on for ages - anywhere from a couple of hours to months. I make sketches and measured drawings. After staring at the inspiration chair for a while, the sides started to remind me of wings. Eventually, the idea of a butterfly came into my mind. I found some examples on the web butterfly chairs, including this one. After blending all these ideas, I came up with the basic design for my chair.
My next step was to go to the computer and overlay my design and the structural drawings from the instructional using a scanner and Photoshop. Once I was happy with these, I bought a 1/4" thick piece of MDF and made a pattern for one side and one half of the back using a jig saw.

For the finished piece, I chose 3/4" Birch plywood. I rough cut the outside of each piece using the jig saw, and then finished cutting them by clamping the pattern to the underside of the birch and using a flush trim bit on the router (after first drilling pilot holes in each section) which copies your pattern exactly. After each piece was cut, I rounded over every exposed edge with the router and cut dadoes for the pieces to fit together per the instructional using a straight cut bit.
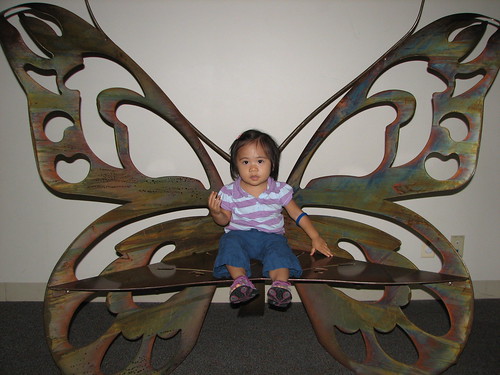
It was a lot of work, but I'm pretty happy with it. The finish isn't exactly what I hoped (amber shellac), but I can always go back and paint it later it it's still bugging me. For now, I'm just happy to call it done.
Merry Christmas and happy crafting!
______________
What I'm working on now: learning needle felting
What I'm thinking about working on after that: birch lap desk


